In today’s digital era, Google Docs has become a ubiquitous tool for collaborative document creation and editing. Whether you are a student, a professional, or an individual seeking to elevate the visual appeal of your documents, understanding how to incorporate various formatting elements is crucial. In this comprehensive tutorial, Techbangalore will delve into a common how to insert vertical line in google docs. By following the step-by-step instructions provided, you will gain the knowledge necessary to enhance the aesthetic appeal and organization of your documents.
The Importance of Vertical Lines
Vertical lines play a crucial role in document formatting as they effectively aid in segmenting sections, creating tables, or highlighting important information. By strategically incorporating vertical lines, you can significantly improve readability and give your document a polished and professional appearance.

How to insert vertical line in google docs?
Before exploring how to insert a vertical line in google docs, you ought to open your preferred web browser and navigate to docs.google.com. Once there, sign in to your Google account or create a new one if you haven’t done so already.
Upon signing in, click on the “+ Blank” button to create a new document. Google Docs provides a blank canvas that allows you to unleash your creativity while offering an array of formatting options to enhance the visual appeal of your document.
Inserting a Vertical Line
How to insert vertical line in google docs? Let us follow these steps:
- Position your cursor at the desired location in the document where you want to insert the vertical line. This could be within a table, as a divider between sections, or anywhere else you find appropriate.
- Locate the top menu and select “Insert.” From the dropdown menu, click on “Drawing.” This action will open a drawing canvas.
- Within the drawing canvas, locate the “Shape” icon situated in the top left corner of the toolbar. It resembles a square with a rounded corner. Click on this icon to reveal a dropdown menu.
- In the dropdown menu, scroll down and select the “Line” option. Upon selection, a crosshair cursor will appear.
- To draw the vertical line, click and drag the cursor vertically. For a perfectly straight line, hold down the Shift key while dragging.
- You can further customize the appearance of the vertical line by clicking on it within the drawing canvas. This action will display a toolbar where you can adjust parameters such as color, thickness, and style, ensuring it blends seamlessly with your document’s overall design.
- Once you are satisfied with the appearance of the vertical line, click on the “Save and Close” button located in the top right corner of the drawing canvas. By doing so, the vertical line will be inserted into your document at the chosen location.

Adjusting the Vertical Line
After inserting the vertical line, you may find the need to make adjustments. Follow these steps to fine-tune its placement and appearance:
- Click on the vertical line to select it. Eight small squares, known as “handles,” will appear at each end and along the line.
- To resize the line, click and drag the handles located at the endpoints. You can elongate or shorten the line according to your preference.
- If you need to reposition the vertical line within the document, click and drag the line itself. This action will enable you to place it precisely where it is most effective.
- To delete the vertical line, press the “Delete” key on your keyboard while the line is selected. Alternatively, right-click on the line and choose “Delete” from the dropdown menu.
Frequently asked questions
Beside answer the questions “How to insert vertical line in google docs”, these are some problems that relate to the topic.
1. Can I insert a vertical line directly from the Google Docs toolbar?
Unfortunately, Google Docs does not provide a direct option to insert a vertical line from the toolbar. However, you can easily accomplish this by following the steps outlined in our tutorial using the “Drawing” feature.
2. Can I change the color and thickness of the vertical line?
Yes, you can customize the appearance of the vertical line by selecting it within the drawing canvas and using the toolbar that appears. You can change the color, thickness, and even the style of the line to suit your preferences and the document’s visual theme.
3. Can I insert multiple vertical lines in a single document?
Absolutely! You can insert multiple vertical lines in a Google Docs document. Simply follow the steps provided for each vertical line you wish to add, positioning them at the desired locations within your document.
4. How to insert vertical line in google docs using tables?
To insert a vertical line in Google Docs using tables, follow these steps:
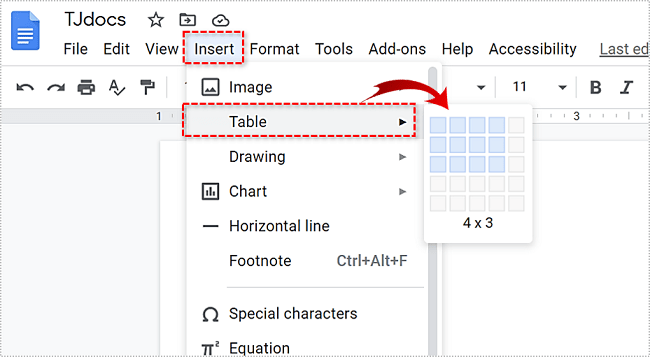
- Insert a table into your document.
- Adjust the table’s border settings to customize the appearance of the vertical line.
- Select the cell where you want to place the vertical line.
- Set the cell background color to match the document’s background color for seamless integration.
- Repeat the process to insert additional vertical lines in different locations within the document.
By leveraging tables, you can create vertical lines that seamlessly blend with your document’s content, offering more control over positioning and customization.
5. How to make a matrix in google docs?
To create a matrix in Google Docs, follow these main steps:
- Insert a table into your Google Docs document.
- Determine the size of your matrix (rows and columns) and adjust the table accordingly.
- Fill in the values or content within the table cells to represent the matrix elements.
- Customize the appearance of the table by modifying cell borders, colors, and font styles.
- Optionally, apply mathematical formatting or formulas to perform calculations or operations on the matrix elements.
- Review and refine the matrix layout and content as needed.
- Share, collaborate, or export the document containing the matrix as required.
By following these steps, you can easily create a matrix in Google Docs, whether it is for mathematical calculations, data representation, or any other purpose that requires a matrix structure.
Conclusion
By following these straightforward instructions, you can effortlessly understand on how to insert vertical line in google docs. Vertical lines are powerful visual aids that improve organization and readability.
Whether you are creating tables, emphasizing specific sections, or simply aiming to add a professional touch, mastering this formatting feature will undoubtedly enhance the visual appeal of your documents. So, go ahead and experiment with vertical lines in your Google Docs, elevating your content with this simple yet impactful formatting element.